Monday, September 17, 2018

The benefits of Morning Meeting

I am so excited to share today about my morning meeting journey! Today is the 24th day in a row I have led a morning meeting with my kiddos.

24 days of school... 24 morning meetings. Yes, every day! And they are about 20-30 minutes long. Which at first may seem like a crazy amount of wasted time but I cannot wait to share some things I am noticing throughout my day that I can accredit to my Morning Meetings. I have so much I would love to share but I am going to share just my top three takeaways from morning meeting so far.


  1. Students -especially fifth graders- are social beings!
I think something we often forget as teachers is how important socialization is. Today at work a co-worker even pointed out to me, "Notice how during your plan time, you take time to go see coworkers you haven't seen throughout the day. And it isn't always about work is it? Sometimes you just want to check in on your friends and so do our students" Morning meeting has allowed a set aside time for students to socialize, to share their thoughts, and to learn about their peers in a safe place. I notice that after spending some time sharing and listening to others, they are so much more ready to dive into learning!

      2. Teamwork and cooperation are built on each morning instead of during instructional time!

Our students have to learn how to work in groups. Many teachers do teambuilding activities throughout their days, as do I. But now, much of this is built into my morning meetings. If I need to quickly put together groups for a project, my students know each and every student in the room and how they can best work with these peers. It isn't an end all be all approach to teaching teamwork, but the more they have to practice it, the better they are at applying it. And we apply it a lot!

       3. You can incorporate the curriculum!

I know that sometimes we worry about instructional time or worse, our principle walking in and asking what it is that we're teaching that aligns to the standards. Well.... check out your speaking and listening skills! Grades K-5 all have a standard on participating in collaborative discussions. It even extends to asking and responding to questions, reporting on a topic, and adapting speech depending on the context.
Just this past week, a student shared that her grandmother broke her arm and now they have to get rid of her dog. Students listened and asked follow up questions. For two reasons, they wanted to know more and they truly cared to understand this students story! 
If speaking and listening skills aren't enough, I will share in a later blog how we use our activities to explore content standards such as science, math, reading, or writing.

If you haven't checked out The Morning Meeting Book by Adaptive Classroom, I highly suggest checking it out. I will definitely be back to share more of my journey with you as well! 

Wednesday, July 18, 2018

I'm Back!

I have always wanted to start my own teacher blog and share all of the amazing things I have learned through out the start of my teaching career. I know that each year I learn something new and the magical thing about teaching is that those moments don't stop after the first few years. I am entering year five and feel like I have many things down but I am always still learning.

This year my goal is to blog much more often. I clearly failed at that the first time I tried but this year I want to try again! So hopefully you are as excited as I am!

This summer, to kickstart my thinking of the 2018-2019 school year I read two books. Throughout the year I hope to share how these books have shaped my teaching in these areas. And if they fail, I am ready to document that as well and add my own twist to make it work for me and my new 5th graders.

The first book I read was The Morning Meeting Book by Kriete and Davis. I have been completely inspired to implement a full 20-30 minute morning meeting to my classroom this year. I have always known the importance of sitting down with your class, debriefing and getting a positive start to the day. But after reading this I am ready for some intentional morning meetings that not only benefit students' social-emotional development but set them up for successful learning throughout the day. I hope to write a lot about this journey on this blog.
Image result for The morning meeting book

The second book I read is one that I have actually had for quite a while now. It has been in my classroom, on a shelf, for a few years. I have started to implement it each year but never quite read the book all the way through. I often struggle with teaching writing, so I am really hoping that this will help shape my writing instruction for this year and help me to feel more successful. This book is Notebook Know-How by Aimee Buckner. It isn't necessarily how to teach the Common Core Standards or how to get the students to write a perfect 5 paragraph essay. Aimee writes about how to get students to just write and love it. It has shifted the way that I think about writing and I hope I can engage more of my students with this approach.
Image result for NoteBook Know-how

I am starting to work on some presentations to share an overview of this info with others and will share them on here when they are complete. Until then, I hope that some of you will check out these great books!

Saturday, August 20, 2016

Classroom News Letter

With the first week under my belt I feel so much more relaxed! It's the weekend and it's time to unwind from the busy week. Relax, watch Netflix, see some friends... or work on stuff for my classroom some more! =]

I always seem to have trouble getting work off my mind especially when I know I have something that needs to get done and this weekend that was my classroom newsletter. I spent this saturday afternoon creating a template to send to parents with information about our week. I am all about making things appealing to the eye so I spent a bit more time on this than needed but it was super fun and I absolutely love it!

Here is the newsletter that was sent out to parents this week. I hope you like it!


Want one for your own classroom? I have created a blank template for you to use as you would like. I used a website called Canva to create this design so if you like my template but want something a bit more customized feel free to hop over to www.Canva.com to create your own!

Enjoy!!


Tuesday, August 16, 2016

First Day!

First day of school... Check!

Third first day is in the books and I wanted to highlight my favorite activity that I've done every year so far. This is nothing new but it really does start off the year on the right foot. We all know what we expect of others and therefore what we should expect of ourselves. This activity is, "A Good Classmate is..." and "A Good Teacher is..."

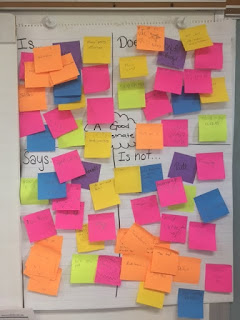
I start off with a blank poster that says "A Good Classmate..." in the middle with four sections to describe what a good classmate is, what a good classmate does, what a good classmate says, and what a good classmate is not.


This is an example of what a good teacher is but I forgot to take a before picture of my classmate chart.

Next I simply opened this discussion up to groups. Students were grouped into tables and given a pack of colored sticky notes. They were asked to finish these sentence starters on separate sticky notes. They needed three in each section and boy did they come up with a lot!


I had students share their words before they added them to the board so that the entire class could hear all of their expectations of each other and so we didn't repeat any sticky notes.

Some ideas we discussed afterwards:

-All of those different colors represent the mix of groups that these ideas came from.
-We showed each tables "left over" sticky notes that didn't get hung up because they were already up there to discuss how we all often have the same expectations of ourselves and others in this classroom.
-We then began discussing classroom expectations that fit into what we all want in a good classmate and a good teacher.

After all of this brainstorming I created two lists of expectations that we will sign and agree to tomorrow!

(Miss DeFay is my year long student teacher. We will be co-teaching this year, how exciting!)


I love this activity because it gets students thinking about their expectations of others in the room. It helps to create a list of classroom norms that essentially was created by the entire class, although I got to change the wording so it encompasses more than just "be kind". Every year my students take great ownership over this lesson and I love seeing the great things they start to think about and write.

How do you set up class expectations in your room?

Wednesday, August 3, 2016

Classroom Banner

It's that time of year again, where we spend our days in our classroom decorating, arranging, creating, and don't forget... we're not getting paid. Nope not yet! I am here out of my own free will and obsession over having the perfect classroom. I don't have the best design style ever but I am super excited about my classroom pennant banner I made today and I wanted to share this with you!


This my work in progress leader in me bulletin board. It still needs some work but I was super excited about the banner up top. "Be the Leader in You", the motto of my classroom this year. If you haven't read about Leader in Me I highly suggest picking up the book and checking it out. I will be sharing a bit of my journey through Leader in Me later on but back to the banner.

This banner cost me less than $2. I was so excited about it and although it took more time than buying a banner I couldn't believe how cheap it was!

I first started with picking the paper, the hardest part! I went to hobby lobby and bought 3 (or how ever many you need) sheets of 8.5x11in paper for $.44 each. And that's it! That is the last of the spending I did for this DIY classroom project. Talk about money saver! Grab any style, any color, any pattern you want and get working.

Next I made took the full sheets and divided them into four equal parts. (can't get away from those fractions even in the summer!)


My pattern made it really easy to cut straight lines but you may need to use a ruler to draw your lines before cutting.

After I had 4 equal sized rectangles I chose how I wanted my pennant shaped. I just cut out a triangle at the bottom of mine and I liked the way it looked.


To make sure each one had the same shape I used this first one as my stencil and the rest I cut the same.


So I had all of my pieces cut out, my 3 sheets made me 12 pennants which was one extra to practice on or if I needed one from a mess up. Next was deciding what to write and the how.

This is the part that you can customize however you'd like. I opened up Microsoft Word and chose a font that I liked for this banner and my plan was to trace the letter onto the pennant.


To do this I had to do a few things. I turned off the lights in my room and turned the brightness on my computer all the way up. This may be easier and more difficult depending on the thickness of your paper. If you use card stock you probably won't be able to see through it to trace but most craft paper should work.

Next, you trace!


I used a thick Sharpie and drew around the edges. You may choose to use a colored Sharpie or another medium to get a different look. Here is where you get creative.

This whole project took me less than an hour and I think it turned out great! I finished it off with some string and push pins to make it look like it is really a hanging banner and I was done! Definitely gives me bulletin board some excitement.


I am excited to try this out with other bulletin boards or hall decor. Hopefully you can find some time to let your creative side out and bump up those bulletin boards with some flare!

Tuesday, July 19, 2016

Genius Hour: Getting Started

My mind has been racing with ideas for my classroom next year and genius hour is on the forefront. If you haven't heard of Genius hour check out GeniusHour.com. Basically it is an idea that google came up with where they allowed their employees time within their work day to work on independent projects or passions. What came out of this? Amazing things like Gmail!

I work with 5th graders and it may seem like they have some crazy ideas sometimes but think about it, give them some time to explore those passions and ideas and who knows what they can come up with! Last year a student in the classroom next door created a campaign to raise awareness of the hazards of texting and driving. Another wanted to learn more about the Mothers Against Drunk Driving campaign after his mother was injured in a drunk driving accident. The ideas are endless, so why limit them!

If you haven't explored this idea with your classroom I strongly suggest you take a peak. And if you do feel ready to try this out I would love to share my website I created to share with students, parents, or teachers to help them get a better understanding of how Genius Hour works. There are a few simple rules but the rest is open for interpretation. Check it out below!

www.jtsdgeniushour.weebly.com

This website includes some guidance for students and even a convenient "Genius Hour Proposal" form for students to brainstorm their passions before starting their project!


Feel free to use this website as you please and leave me feedback. Let me know how YOU use Genius Hour in your classroom! 

I am excited to try this out in my classroom and will definitely be updating you on student progress and passions.


Monday, July 11, 2016

Adorable classroom crate seats

Hey all! Are you ready to follow me through my third year teaching antics? I thought I would start my blogging this summer and share some of my classroom finds! A sneak peak at some things I plan to share this year are my ideas for:
-Flexible Seating
-Classroom/School Wide Leadership
-STEM Activities
-Flexible Student Scheduling
-Technology in the classroom
And much much more....

Today was my first "work day" with some of my coworkers. Instead of spending the day planning lessons or writing first week plans we chose to spend it traveling the town in search for Flexible Seating for our classrooms.

I will share more of my flexible seating options when I get into my classroom but I thought I'd share how to create these adorable crate seats!


We started by heading to Walmart and grabbing their storage crates in the back to school section for less than $4 each!

Next stop was Home Depot. Me and 2 others grabbed a large sheet of 1/2 inch plywood and asked them to cut it to the dimensions of the basket, 17'' x 14''. This part was the easiest because Bruce let us browse the rest of the store while he cut our giant piece of plywood into over 15 squares.

Then we headed over to Hobby Lobby. Any fabric or craft store will have the supplies but we made sure to check all the sales and prices before purchasing anything and this lead us to Hobby Lobby.

We bought these Poly Foam Pads for each seat. Notice the dimensions are 14x14 rather than 14x17 but it still looked fine after upholstering. We spent the extra $2 for the 2'' instead of the 1'' but I am sure those would work as well for a bit cheaper. These foam pads were 30% off for a while and Hobby Lobby always offers 40% off a full priced item, so with the right timing you can get these for even less!

Then the toughest part came... what fabric will I cover them with!? So we headed over to the fabric section of Hobby Lobby. They often have sales on their fabric as well. I went for the duck cloth because it is much sturdier than cotton. I ended up getting 1 yard for 4 crate seats at $9.99 and used my 40% off coupon  and spent just $6.

After our shopping spree I had collected
-4 crates ($14)
-4 squares of 1/2 in plywood (>$5 with much extra)
-4 foam squares ($14)
-1 yard of duck cloth frabric ($6)
this tallies up to less than $10 per seat. Well worth it for how much my kiddos LOVE these seats. Plus they can easily be reupholstered each year or after wear and tear.

The last step is to use a staple gun to actually upholster the seats. It's so easy!

1) I cut my 1 yard of fabric into 4 equal squares.
2) Place one square of fabric face down on the floor.
3) Set the cushion in the center with the plywood on top.
4) Pull sides up tightly and staple!

It's as easy as that! And they're super cute and sturdy.

It only took about 20 minutes to make all four and even my kitty cat enjoys them! Super cute for a classroom, children's room, outdoor seating, and more! These seats will sit next to a large table that sits about 2 feet above the floor. My students love working at this low desk and sitting on this alternative seating. *More pictures to come


Hope all my teacher friends are enjoying their summer. Live it up while we can!